Showing posts with label Holz. Show all posts

Thursday, February 11, 2016

Creating Valentines: Accidental Monoprints and more....

So as I was working, thought I needed a heart here or there- so cut a simple stencil.
I sprayed it with magenta and purple, then immediately scratched back into it to get the heart below. 


Then i looked at the stencil itself and thought- I like the stencil image as much or more than the heart itself! so I hurried and placed a piece of tag board on it to take a monoprint, or a one time print. 


Inspired/rewarded by this, I hurried up and slapped a piece of tag on the heart I just stenciled in my journal, and got this lovely slightly lighter ghost print!  


Although not much was needed to finish this one, I screened on love, and spray painted a background to set it off. 


The two below were also done using the same concept- but a bit more layering! The monoprint almost acted like a cropping tool in itself.  


The following ones involved a bit more cropping and removing, keeping the lovely parts of the compositions, and cutting out the more boring or blotted parts! Of course- the shape I removed was a heart! I layered it on top of a peach piece of unryu, or a type of very thin rice paper.  Although I liked the combo- I thought it needed more, so filled an ink marker with one of the colors that were sprayed in the center square and wrote "happy valentines day" around the edge, and highlighted some of the edges with some dots. 


 A similar treatment here, with a more geometric composition.  I layered a nice chunk of paper with some regular tissue, but again- didn't feel quite done, and some extra line work balanced it out nicely.


I have lots of friends who share my passion for music, so this was made for them.  The library was giving away books so old the paper was brittle- but worked for my needs! Did some pouring and spraying, cutting/gluing, and have a music themed valentine! 


I invited a friend to play in the studio with me, and she wanted a paw print (we are both dog people!) so we cut this stencil to use.  This one is going to puppy Izzy, a friends long awaited new addition to the family! 
I know, valentine crazy !


Well- I hope you all enjoy an artful happy valentine day! 


Thursday, January 28, 2016

Splashy Block O'Love...using water patterns

For my next batch of blocks o’ love valentines, I treated myself to some new acrylic spray paint by Liquitex!

They seem to have a bigger range of colors, and hoping they clogged less frequently than the ones I was using prior-(Montana Gold brand). And since the valentine palette is not my “normal” color range, I needed to add some more colors to my collection (note- any type of rationalization is acceptable when it comes to buying new art supplies!! :)

Anyhow armed with these new colors, I warmed up in my art journal and I pulled out some papers to practice on. My theory is when you are doing processes that require quick 
spontaneous actions, you need to do lots- some to warm up, and then make many so you have options and can be selective about which ones are the best. Picasso said the artist best tool can be the garbage can! In other words- edit yourself. If they suck, paint over them and keep going. But if they work- they deserve to live:) It’s being able to recognize the difference and stop at the right point that has taken years to perfect. So those fun splashy designs you see and think must've taken only a moment to create are are usually the 6th or 7th or 10th attempt, not the first.  Why not just apply with a brush? Because I think naturally derived patterns are gorgeous- and letting water do what it does naturally creates some lovely shapes and patterns. Thus- my use of many fluid processes…


So on with the fun part! I did some splashing, spraying, then quick wiping away before the paint had a chance to dry.  A couple of them I dropped in some liquid inks on, maybe some more water, and let them dry.  Seal them up with a quick layer o clear acrylic once they were dry and they were ready for next step.


 For this one, I liked the pattern created by the water so much, didn't want to add too much more - so I opted to add two little hearts and no text or screens. I scrubbed/sanded off a little more magenta to have a simpler background for the hearts. Then I cut some stencil hearts, but once I sprayed them I thought they were a bit too solid- so to add some texture I scratched back into the paint with the end of a paintbrush. I thought it still needed a little more contrast/definition, so I loaded one of my new ink pens with FW inks in black, and just traced the hearts with playful lines and a couple o dots here and there.  Voila! dry, spray seal,-done! 


This block was bought to give to a mom and her little girl… sweet! 
Spreading the love….

See the rest of the blocks o’ love here….

Friday, January 15, 2016

Making Blocks O'Love

I love the LOVE holiday! Smack dab in the middle of winter, I  need a little splash of color and love to get me through to spring. So around this time every year, I change my color palette to magentas, purples, pinks and reds.  Last year I made batik paper Valentines, this time I had more of an object in mind, but couldn't find exactly the right support, so went to the lumberyard and bought the biggest chunks of wood I could find. I came back to the studio, cut them up, gave em a good sanding


 and coated with several layers of gesso.  Next -color palette!  I never allocate enough time for this, or realize how much time it takes because it's fun to pick colors!  but it takes time to make the colors in front of you matched the colors in your head, and then to make sure that each type of sprayer, squeeze, bottle, or applicator is working correctly so I can spray, splash, pour, or drip!


I had decided to incorporate some poems and words of love into these, and figured silkscreens would be the best way.  So spent an afternoon playing with type/text on the computer,  and then with ink and japanese brushes making loose hearts to use for my silkscreen imagery.  


Finally, I got to play! i "warmed up" in my art journal first- a safe place to experiment-
  

Then jumped in!  I spent a very fun afternoon splashing, pouring, and  spraying. I made about two dozen so far, too many to go over all in here, so I'll feature a couple this week.


First layer of inks, spray paint and gesso. 

Then I "audition" which screens i want to use by laying a transparency over the painting. 
i ended up going with Elizabeth Barrett Browning's poem "How do I love thee?" for the piece on the right. Once i have it where i want it- i screen it on. 


I decided I wanted to obscure the lower right a bit- so went back in with the burst of white. Then I cut a stencil to fill the inside of my silkscreen heart, and spray paint it on, then quickly scrubbed and sanded away to rough up the surface and make it more interesting....


then finally line up the silkscreen, and add the back contrasting heart (painted earlier with Japanese brush, then made into a silk screen) 
Finished piece! 


At this point, this one is still available but they are going fast! 


Thursday, January 7, 2016

Photo Gifts...

Since Christmas has passed- I can post this without ruining any surprises!

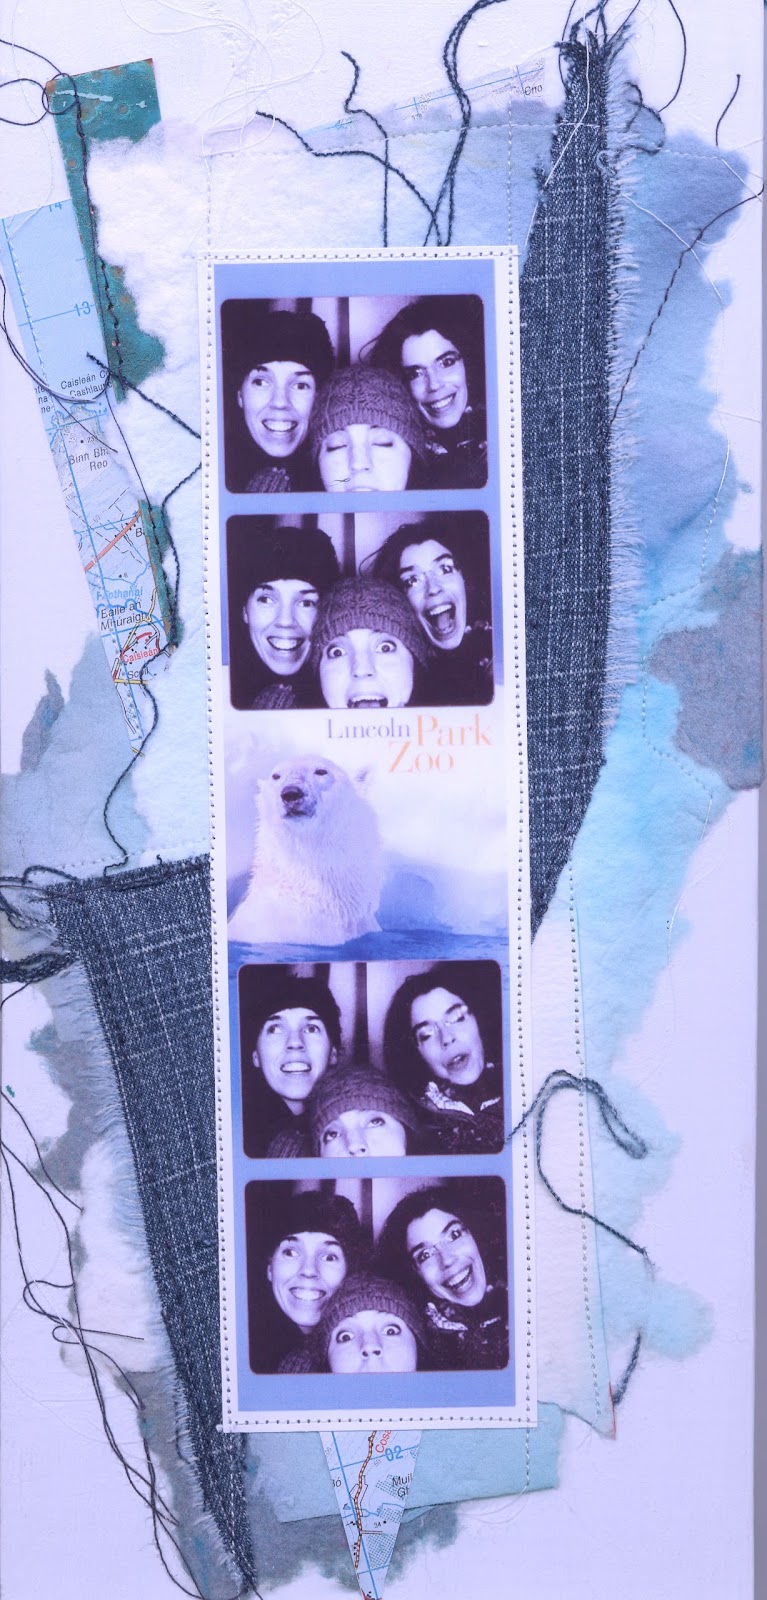
This gift wasn't planned out- and the sister that it was intended for is a world class procrastinator so I know she'd understand.  I am horrible about saving and framing pictures, but enjoy receiving them from people who went ahead and did the work for me. I thought I would reciprocate this year by properly framing a picture for my sister's new house.  Well- by the time I got around to it- it was way too late to be done by Christmas. It was one of those old fashioned photo booth both pictures from a sisters day out downtown a couple of years back.   The size wasn't standard, so I couldn't find a ready made frame for it. But I figured I could do something to finish it anyhow, so I brought it to the studio  to play with it.  Here was my alternative framing solution.

I found and cut a board a little larger than the photo, and then gessoed it, and attached hanger on the back.


Knowing her bedroom color was blue, i foraged for blue in my papers and found handmade appears form grad school, old jeans- and a map of Dingle Bay in Ireland (my sister is a geography whiz, map lover,  and world traveler, so i knew she would appreciate.) So- threw that in there.


I played around with various stacks of arrangements and liked this one. 


I taped it down with painters tape to keep it in place


then sewed the layers together. 


I glued it to the front, gave it a protective spray on the top- and wrapped it as soon as it was dry! 


Tuesday, November 17, 2015

One thing leads to another…or being led by your love of subject matter

I guess it started out with this large collage.
 I am always on the lookout for texts/books with a natural history slant, and a particularly fruitful visit to the Kane county flea market garnered me quite a few treasures…  so I started out with a collage from parts of an antique birding book, then thought perhaps I could use those wing diagrams that I found years ago, so I dug them up and made a silkscreen of them and included those as well. And that lead me to thinking of nests and eggs and spending way too much time looking at a field guide to bird’s eggs and evaluating their different patterns and how they are made.  So of course, I had to stop and make a screen of those as well. Fast-forward and here is the result.  

Nature Ephemera:  Flycatcher Fossil Fungus

Well as it frequently happens, one piece leads to another.  Sometimes its preplanned and logical, but sometimes its merely not wanting to waste the rest of the palette you've mixed or that screen that's loaded with ink and will just go to waste, so why not put it on…. (she thinks as she looks at all the potentially eligible projects/problems/prospects on the wall…)  that one.   I found two potential recipients.  And so that's how these two what I like to call “peripheral pieces” were started….
And there they stayed for weeks, with countless options being considered for the center/focal point.  An actual nest and egg were an obvious choice-sure! That would be fun, and although I have a good collection of both- none of them were a perfect fit. So- they hung there bugging me.

   Then I did an acetone transfer onto an old page for another piece, and perhaps it was the palette of the old page that seemed to lend itself to the colors of my unfinished panels…or? But anyway it hit me that this could be the solution.  . …and as soon as I tried a very old birding illustration on that page- that was it. 


"Ovenbird"

"Tree Swallows on a Wire"


So not only did they provide the focal points for these two, it spurred me on to other pieces.  I greedily went thru pages of this old book, selecting birds not only for their beauty- but getting sucked into reading about their habitats and behaviors… not really what I should be doing with a big deadline looming on the horizon! But those passions fueled these small ATCs (Artist Trading Cards) and were the perfect solution for me to use more of that bird imagery- and my feather collection- on a small scale….


I totally enjoy playing around with pure abstraction of color and pattern- but it is just not enough for me.  I am compelled time and again to incorporate examples from nature that relate…. and if it leads to hours perusing birding guides, then so be it.    I guess I am really am a wannabe naturalist with an artistic bent.  I plan on continuing this birding series further…Stay tuned...

Thursday, November 12, 2015

Probably not what my mom had in mind...

...when she taught me to sew!  I can't really pinpoint what motivated me to do this-maybe all those lovely papers I've been collecting and altering?  All I know is that I kept waking up in the morning with the urge to sew these papers together, so....I lugged the sewing machine to the studio, wrestled with the tension knob, and started sewing!  I love the pattern stitching makes- even without thread, but then there are of course a whole palette of colors of thread, and the lovely little threads that are like fringe along the edge.  And bonus- I can immerse them in wax as well so they can play with my encaustic works! 


Here’s an example of how one came about...

arranging and selecting the papers/shapes/textures...
(an old intaglio print that I painted on,
(see this post http://holzstudiosampling.blogspot.com/2015/10/altered-papers.html),
banana bark paper, a page from an old encyclopedia of Britannica about louis XVI...)


stitching some of the layers together...


considering the background...


keeping the threads out of the way from the blowtorch and wax...


auditioning it on its panel...


adding some more layers of texture and staining- and i think she's done....