Thursday, December 31, 2015

Edible Art

My Christmas present to me this year was being able to spend 5 days with the best nieces in the world!  When they visit we usually have some sort of art project we tackle together.  Since it was the holiday season, I thought some gingerbread houses were in order.  I made lots of these when I was growing up after taking a cake decorating class, and enjoyed doing them- but thought I'd pass on the actual baking of the gingerbread.  After all- the most fun part is the decorating! So we opted for the graham cracker options.  Amy and I wanted to build a cardboard base first, 
and Natalie decided to jump in when she saw what we were making... 

We used boxes that gifts had been shipped in-recycleing!


Festive headwear was optional, but encouraged:) Christmas carols were mandatory. 


The older girls- Emily and Meagan- opted to watch Christmas movies until we got to frosting and decorating parts- using graham crackers for their building base. 


Then the fun part- decorating! The table looked like a sugar explosion! 

It was fun to see how each girl tackled the task.  

Amy totally surprised me by frosting millions of little pretzels to her "log cabin"!  


At first Natalie was going to make a village of little cabins, but then built a large tower house with peanut chimney- but surrounded it with a fire pit (tootsie roll logs and jujube flame), a lawnmower, a tree, walkway- and of course night lighting!


...showing off her fire pit...


Meagan jumped in and got a house up faster than any of us! and was able to add a porch roof with icicles fully supported by candy canes!


And Emily of course took an on unconventional structure- a base for a large (sugar cone) telescope! love it!! 

...and finally mine. Saw the shredded wheat or used on pintrest, and had to try it!  I also used mini oreos  for shingles and decorative additions to the house! This will be heading to an after school program to be eaten and disabled by local kids after the new year!  


Merry New year!! 


Thursday, December 17, 2015

Artful Wrapping

I spend way too much time wrapping presents- but can't pass up the opportunity to create beauty!
For some reason I can't explain, I have a thing against slapping bow on a package and calling it done. So instead  I use an assortment of materials ( all got at clearance sales) to create a different sort of focal point on a package. Here are a couple of favorites wrapped last night!


...and the kittens are having a heyday with all the ribbons...


Wednesday, December 9, 2015

An Artful eye to the Holidays...Floral

So after the big push for open studio followed by travelling for Thanksgiving, and now Christmas coming up, my focus has shifted a bit to the holidays.   The next couple blogs will focus on applying an artful eye to the holidays. 

It was my turn to host my high school friends Christmas party. Yeah! I love them and look forward to all the fun at unbelievable decibel levels :), but we don't have a huge house, and was worried how to seat everyone.  So I dragged home my paint-splattered table from the studio to seat 8- but somehow had to make it look good.  My first thought on how to do that was with color- living color! Flowers. You just can’t have enough flowers! First I trolled around on Pintrest to get some ideas, and then armed with inspiration I went to Trader Joes and selected a nice assortment of red, (of course) lime green, and white. (Trader Joes has a good unusual assortment of flowers for reasonable prices.) Then home to do some pruning of my holly and evergreens in the yard. Containers were next- keeping it low- so we don't have to dodge the centerpiece to talk (I have gotten carried away before and ended up with huge arrangements.) 

Here's the kitchen loaded with buckets of flowers, greens, and other potential materials....

I made multiples, so each couple could bring one home. I started out with a bed/layer of evergreens that kind of acted as a base.  I started adding the mum like flowers, and finally roses last. I realized I really wanted to repeat the round shape of the container in the arrangement, so I dug out some old red ball ornaments, and wired them so I could insert them into the arrangement.  I am not big on “bling”, but if its appropriate at any time of the year- its now! And I know my girlfriends love it too. So- dragged out my wrapping box and used up a roll of lime green glittery ribbon (Michaels post Christmas sale) and wired loops of them to add as well.  I think they came out well and my guests were thrilled to bring them home as parting party gifts!  They held up well- these pics are 5 days after I made them...


and the final table....


Thursday, December 3, 2015

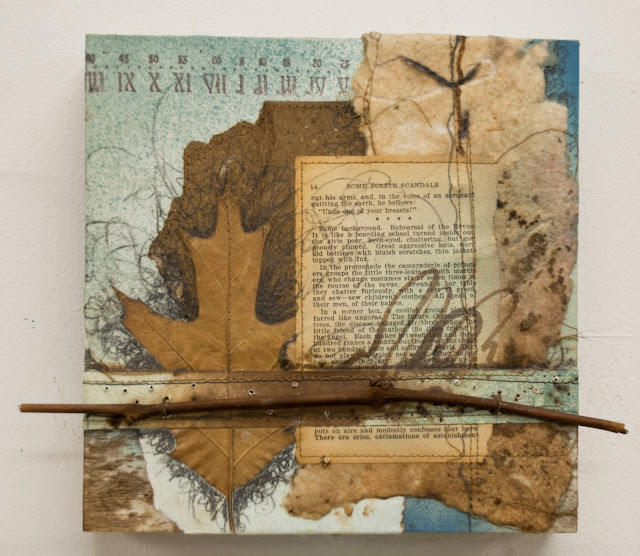
The process behind "Walnut Blues"

Today doing a visual tracing of the development of "Walnut Blues."

Got my walnut inks in the mail, and couldn't wait to play with them. I used the back of an old print, partly because I hate to waste paper, and partly because I though the printmaking paper surface would be a lovely absorbent surface to test out the inks! so used some walnut ink, and also diluted a mix of FW acrylic inks. 
Then I played around with layering some old handmade paper (slightly spattered with ink) and a page form one of my flea market antique books. 


i put the papers on wax paper to save the work surface- and thought that was a waste of ink, so did a monoprint of sorts with the raw wood panel to pick up the excess walnut ink. loved the pattern it created! 


played around pulling together different collage elements..ik


toying around with the idea of adding a willow twig


then gently taped them tougher with painted tape to make it through the sewing machine....


so I had a collage sewn together...


I adhered it to the panel, embellished with some graphite, ink, and wired that willow twig on 
(after coating it with walnut ink and spraying to seal it!)


Tuesday, November 17, 2015

One thing leads to another…or being led by your love of subject matter

I guess it started out with this large collage.
 I am always on the lookout for texts/books with a natural history slant, and a particularly fruitful visit to the Kane county flea market garnered me quite a few treasures…  so I started out with a collage from parts of an antique birding book, then thought perhaps I could use those wing diagrams that I found years ago, so I dug them up and made a silkscreen of them and included those as well. And that lead me to thinking of nests and eggs and spending way too much time looking at a field guide to bird’s eggs and evaluating their different patterns and how they are made.  So of course, I had to stop and make a screen of those as well. Fast-forward and here is the result.  

Nature Ephemera:  Flycatcher Fossil Fungus

Well as it frequently happens, one piece leads to another.  Sometimes its preplanned and logical, but sometimes its merely not wanting to waste the rest of the palette you've mixed or that screen that's loaded with ink and will just go to waste, so why not put it on…. (she thinks as she looks at all the potentially eligible projects/problems/prospects on the wall…)  that one.   I found two potential recipients.  And so that's how these two what I like to call “peripheral pieces” were started….
And there they stayed for weeks, with countless options being considered for the center/focal point.  An actual nest and egg were an obvious choice-sure! That would be fun, and although I have a good collection of both- none of them were a perfect fit. So- they hung there bugging me.

   Then I did an acetone transfer onto an old page for another piece, and perhaps it was the palette of the old page that seemed to lend itself to the colors of my unfinished panels…or? But anyway it hit me that this could be the solution.  . …and as soon as I tried a very old birding illustration on that page- that was it. 


"Ovenbird"

"Tree Swallows on a Wire"


So not only did they provide the focal points for these two, it spurred me on to other pieces.  I greedily went thru pages of this old book, selecting birds not only for their beauty- but getting sucked into reading about their habitats and behaviors… not really what I should be doing with a big deadline looming on the horizon! But those passions fueled these small ATCs (Artist Trading Cards) and were the perfect solution for me to use more of that bird imagery- and my feather collection- on a small scale….


I totally enjoy playing around with pure abstraction of color and pattern- but it is just not enough for me.  I am compelled time and again to incorporate examples from nature that relate…. and if it leads to hours perusing birding guides, then so be it.    I guess I am really am a wannabe naturalist with an artistic bent.  I plan on continuing this birding series further…Stay tuned...

Thursday, November 12, 2015

Probably not what my mom had in mind...

...when she taught me to sew!  I can't really pinpoint what motivated me to do this-maybe all those lovely papers I've been collecting and altering?  All I know is that I kept waking up in the morning with the urge to sew these papers together, so....I lugged the sewing machine to the studio, wrestled with the tension knob, and started sewing!  I love the pattern stitching makes- even without thread, but then there are of course a whole palette of colors of thread, and the lovely little threads that are like fringe along the edge.  And bonus- I can immerse them in wax as well so they can play with my encaustic works! 


Here’s an example of how one came about...

arranging and selecting the papers/shapes/textures...
(an old intaglio print that I painted on,
(see this post http://holzstudiosampling.blogspot.com/2015/10/altered-papers.html),
banana bark paper, a page from an old encyclopedia of Britannica about louis XVI...)


stitching some of the layers together...


considering the background...


keeping the threads out of the way from the blowtorch and wax...


auditioning it on its panel...


adding some more layers of texture and staining- and i think she's done....