Friday, January 15, 2016

Making Blocks O'Love

I love the LOVE holiday! Smack dab in the middle of winter, I  need a little splash of color and love to get me through to spring. So around this time every year, I change my color palette to magentas, purples, pinks and reds.  Last year I made batik paper Valentines, this time I had more of an object in mind, but couldn't find exactly the right support, so went to the lumberyard and bought the biggest chunks of wood I could find. I came back to the studio, cut them up, gave em a good sanding


 and coated with several layers of gesso.  Next -color palette!  I never allocate enough time for this, or realize how much time it takes because it's fun to pick colors!  but it takes time to make the colors in front of you matched the colors in your head, and then to make sure that each type of sprayer, squeeze, bottle, or applicator is working correctly so I can spray, splash, pour, or drip!


I had decided to incorporate some poems and words of love into these, and figured silkscreens would be the best way.  So spent an afternoon playing with type/text on the computer,  and then with ink and japanese brushes making loose hearts to use for my silkscreen imagery.  


Finally, I got to play! i "warmed up" in my art journal first- a safe place to experiment-
  

Then jumped in!  I spent a very fun afternoon splashing, pouring, and  spraying. I made about two dozen so far, too many to go over all in here, so I'll feature a couple this week.


First layer of inks, spray paint and gesso. 

Then I "audition" which screens i want to use by laying a transparency over the painting. 
i ended up going with Elizabeth Barrett Browning's poem "How do I love thee?" for the piece on the right. Once i have it where i want it- i screen it on. 


I decided I wanted to obscure the lower right a bit- so went back in with the burst of white. Then I cut a stencil to fill the inside of my silkscreen heart, and spray paint it on, then quickly scrubbed and sanded away to rough up the surface and make it more interesting....


then finally line up the silkscreen, and add the back contrasting heart (painted earlier with Japanese brush, then made into a silk screen) 
Finished piece! 


At this point, this one is still available but they are going fast! 


Thursday, January 7, 2016

Photo Gifts...

Since Christmas has passed- I can post this without ruining any surprises!

This gift wasn't planned out- and the sister that it was intended for is a world class procrastinator so I know she'd understand.  I am horrible about saving and framing pictures, but enjoy receiving them from people who went ahead and did the work for me. I thought I would reciprocate this year by properly framing a picture for my sister's new house.  Well- by the time I got around to it- it was way too late to be done by Christmas. It was one of those old fashioned photo booth both pictures from a sisters day out downtown a couple of years back.   The size wasn't standard, so I couldn't find a ready made frame for it. But I figured I could do something to finish it anyhow, so I brought it to the studio  to play with it.  Here was my alternative framing solution.

I found and cut a board a little larger than the photo, and then gessoed it, and attached hanger on the back.


Knowing her bedroom color was blue, i foraged for blue in my papers and found handmade appears form grad school, old jeans- and a map of Dingle Bay in Ireland (my sister is a geography whiz, map lover,  and world traveler, so i knew she would appreciate.) So- threw that in there.


I played around with various stacks of arrangements and liked this one. 


I taped it down with painters tape to keep it in place


then sewed the layers together. 


I glued it to the front, gave it a protective spray on the top- and wrapped it as soon as it was dry! 


Thursday, December 31, 2015

Edible Art

My Christmas present to me this year was being able to spend 5 days with the best nieces in the world!  When they visit we usually have some sort of art project we tackle together.  Since it was the holiday season, I thought some gingerbread houses were in order.  I made lots of these when I was growing up after taking a cake decorating class, and enjoyed doing them- but thought I'd pass on the actual baking of the gingerbread.  After all- the most fun part is the decorating! So we opted for the graham cracker options.  Amy and I wanted to build a cardboard base first, 
and Natalie decided to jump in when she saw what we were making... 

We used boxes that gifts had been shipped in-recycleing!


Festive headwear was optional, but encouraged:) Christmas carols were mandatory. 


The older girls- Emily and Meagan- opted to watch Christmas movies until we got to frosting and decorating parts- using graham crackers for their building base. 


Then the fun part- decorating! The table looked like a sugar explosion! 

It was fun to see how each girl tackled the task.  

Amy totally surprised me by frosting millions of little pretzels to her "log cabin"!  


At first Natalie was going to make a village of little cabins, but then built a large tower house with peanut chimney- but surrounded it with a fire pit (tootsie roll logs and jujube flame), a lawnmower, a tree, walkway- and of course night lighting!


...showing off her fire pit...


Meagan jumped in and got a house up faster than any of us! and was able to add a porch roof with icicles fully supported by candy canes!


And Emily of course took an on unconventional structure- a base for a large (sugar cone) telescope! love it!! 

...and finally mine. Saw the shredded wheat or used on pintrest, and had to try it!  I also used mini oreos  for shingles and decorative additions to the house! This will be heading to an after school program to be eaten and disabled by local kids after the new year!  


Merry New year!! 


Thursday, December 17, 2015

Artful Wrapping

I spend way too much time wrapping presents- but can't pass up the opportunity to create beauty!
For some reason I can't explain, I have a thing against slapping bow on a package and calling it done. So instead  I use an assortment of materials ( all got at clearance sales) to create a different sort of focal point on a package. Here are a couple of favorites wrapped last night!


...and the kittens are having a heyday with all the ribbons...


Wednesday, December 9, 2015

An Artful eye to the Holidays...Floral

So after the big push for open studio followed by travelling for Thanksgiving, and now Christmas coming up, my focus has shifted a bit to the holidays.   The next couple blogs will focus on applying an artful eye to the holidays. 

It was my turn to host my high school friends Christmas party. Yeah! I love them and look forward to all the fun at unbelievable decibel levels :), but we don't have a huge house, and was worried how to seat everyone.  So I dragged home my paint-splattered table from the studio to seat 8- but somehow had to make it look good.  My first thought on how to do that was with color- living color! Flowers. You just can’t have enough flowers! First I trolled around on Pintrest to get some ideas, and then armed with inspiration I went to Trader Joes and selected a nice assortment of red, (of course) lime green, and white. (Trader Joes has a good unusual assortment of flowers for reasonable prices.) Then home to do some pruning of my holly and evergreens in the yard. Containers were next- keeping it low- so we don't have to dodge the centerpiece to talk (I have gotten carried away before and ended up with huge arrangements.) 

Here's the kitchen loaded with buckets of flowers, greens, and other potential materials....

I made multiples, so each couple could bring one home. I started out with a bed/layer of evergreens that kind of acted as a base.  I started adding the mum like flowers, and finally roses last. I realized I really wanted to repeat the round shape of the container in the arrangement, so I dug out some old red ball ornaments, and wired them so I could insert them into the arrangement.  I am not big on “bling”, but if its appropriate at any time of the year- its now! And I know my girlfriends love it too. So- dragged out my wrapping box and used up a roll of lime green glittery ribbon (Michaels post Christmas sale) and wired loops of them to add as well.  I think they came out well and my guests were thrilled to bring them home as parting party gifts!  They held up well- these pics are 5 days after I made them...


and the final table....


Thursday, December 3, 2015

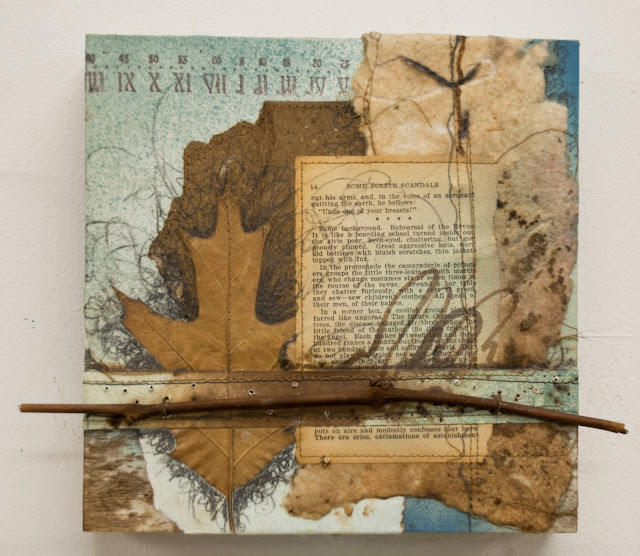
The process behind "Walnut Blues"

Today doing a visual tracing of the development of "Walnut Blues."

Got my walnut inks in the mail, and couldn't wait to play with them. I used the back of an old print, partly because I hate to waste paper, and partly because I though the printmaking paper surface would be a lovely absorbent surface to test out the inks! so used some walnut ink, and also diluted a mix of FW acrylic inks. 
Then I played around with layering some old handmade paper (slightly spattered with ink) and a page form one of my flea market antique books. 


i put the papers on wax paper to save the work surface- and thought that was a waste of ink, so did a monoprint of sorts with the raw wood panel to pick up the excess walnut ink. loved the pattern it created! 


played around pulling together different collage elements..ik


toying around with the idea of adding a willow twig


then gently taped them tougher with painted tape to make it through the sewing machine....


so I had a collage sewn together...


I adhered it to the panel, embellished with some graphite, ink, and wired that willow twig on 
(after coating it with walnut ink and spraying to seal it!)